CHICAGO HARDWOOD FLOORING BLOG
Tips and tricks for all your hardwood flooring needs by a local flooring company in Chicago.

A Wood Floor Refinishing Story In The Chicagoland Suburbs
In this blog post I walk you through one of our typical flooring projects from the perspective of my comedic alter ego, Mr Plus. We are a hardwood flooring company that services the Chicagoland area for Hardwood Floor Refinishing and Installation projects.
This is a comedic manifesto written from the first person perspective of my flooring alter ego, mr plus
Dear blogging familia. This project. Oh man. This project was really something. It was going to be my two weeks of heaven. I’d finally get to sleep in, because this place was in the Chicago suburbs conveniently nestled right behind my neighborhood in Highland Park, IL.
An absolute peach of a job, location wise. I got to snooze the alarm multiple times, this one was going to be a dream come true in the wild stardom of my flooring career. I was feeling like a bad boy that week too, so I said fuck it and bought a pack of cigarettes that I was going to secretly smoke throughout the week without telling anyone. To my girlfriend Terrah, babe if you’re reading this, I’m sorry. It was just all gas that week, I was feeling cool and there was no shot of slowing down when I was rocking the Sprinter van with Ferrari shades on.
7am - first day of the Project
Voila! We were off. Sprinter van chugging that beautiful diesel gold that it does, humming along beautifully. Rap beats blasting on my radio while I drove to work practicing my freestyle raps. Did Kanye truly live the life of Jesus? Could he have? When I was the one that was woodworking for the first 30 years of my life? Just the typical thoughts that ran through my head that day. What could possibly ruin this? There was absolutely nothing that was bringing down this energy baby, we were soaring through the sky.
Oh, except the screw we ended up hitting in the driveway later that day, which resulted in the flat tire that we then later got. But hey, that’s business baby. Now show me that wood.
Pulled up to the job
Sprinter brakes squeaking so badly my ear drums popped. Honestly, I have no clue if the brakes are even still good. Haven’t checked them in months. They still stop the car, so today could already be going a lot worse but it’s not. We’re keeping our head up.
I look over, my flooring ninjas are already there. These are the coolest, coldest, hardest working flooring cowboys from the south of the border that you’ve ever fuckin’ seen, pal.
There’s Mariano, a true G and one of my longest working/most loyal daily grinding pals. We’re homies for life.
Walking up with him is Jesus. Yes, you read that right. No further explanations needed. He’s short, yet they’d still need a cross twice the size they used on the original one.
And last but not least, the undisputed flooring heavyweight champion of the world, Mr. Julio. He’s young, like me, and he’s hungry which I respect greatly. He’s a true woodworking artist down to his blood with the machines and brushes. I could feel it since day one, he’s got that Flooring God particle in his DNA. The type of guy you know is running his own operation one day.
We bust open the door


Fuck! Guys, there is borders to replace and an entire room to install. We’ve gatta replace all of the red Brazilian Cherry borders with normal looking Oak. I’ll go get the red bulls, y’all start firing up the saws, this place is about to turn into a battlefield.
Wrecking Ball by Miley Cyrus playing on my way back to the same gas station I had already been at. Covered completely in dust for this second visit, the clerk was about to find out who I really was that morning. “Oh, haha, why am I dusty? I happen to be Mr Plus, baby.” I kiss my cross necklace right in front of them, and I walk out.
I make it back to the house. Wouldn’t you know it, things look worse then they did before. But some progress was good progress, so we were getting through.
By these next photos, it’s been days.


We’re still working on just getting through the very first installation portion of the job, and I was already contemplating a second pack of cigarettes.
Oh did I tell you, we were doing this entire staircase too, lol. But as you can see, the new railings are already finished and installed. I was too amped from a mixture of red bull & cigarettes that entire first week so I forgot to take a picture of the previous old stuff. Here’s the new stuff already installed.

Shit, did I also forget to mention there was an entire back staircase with a new railing system to be installed too? nervous laughing

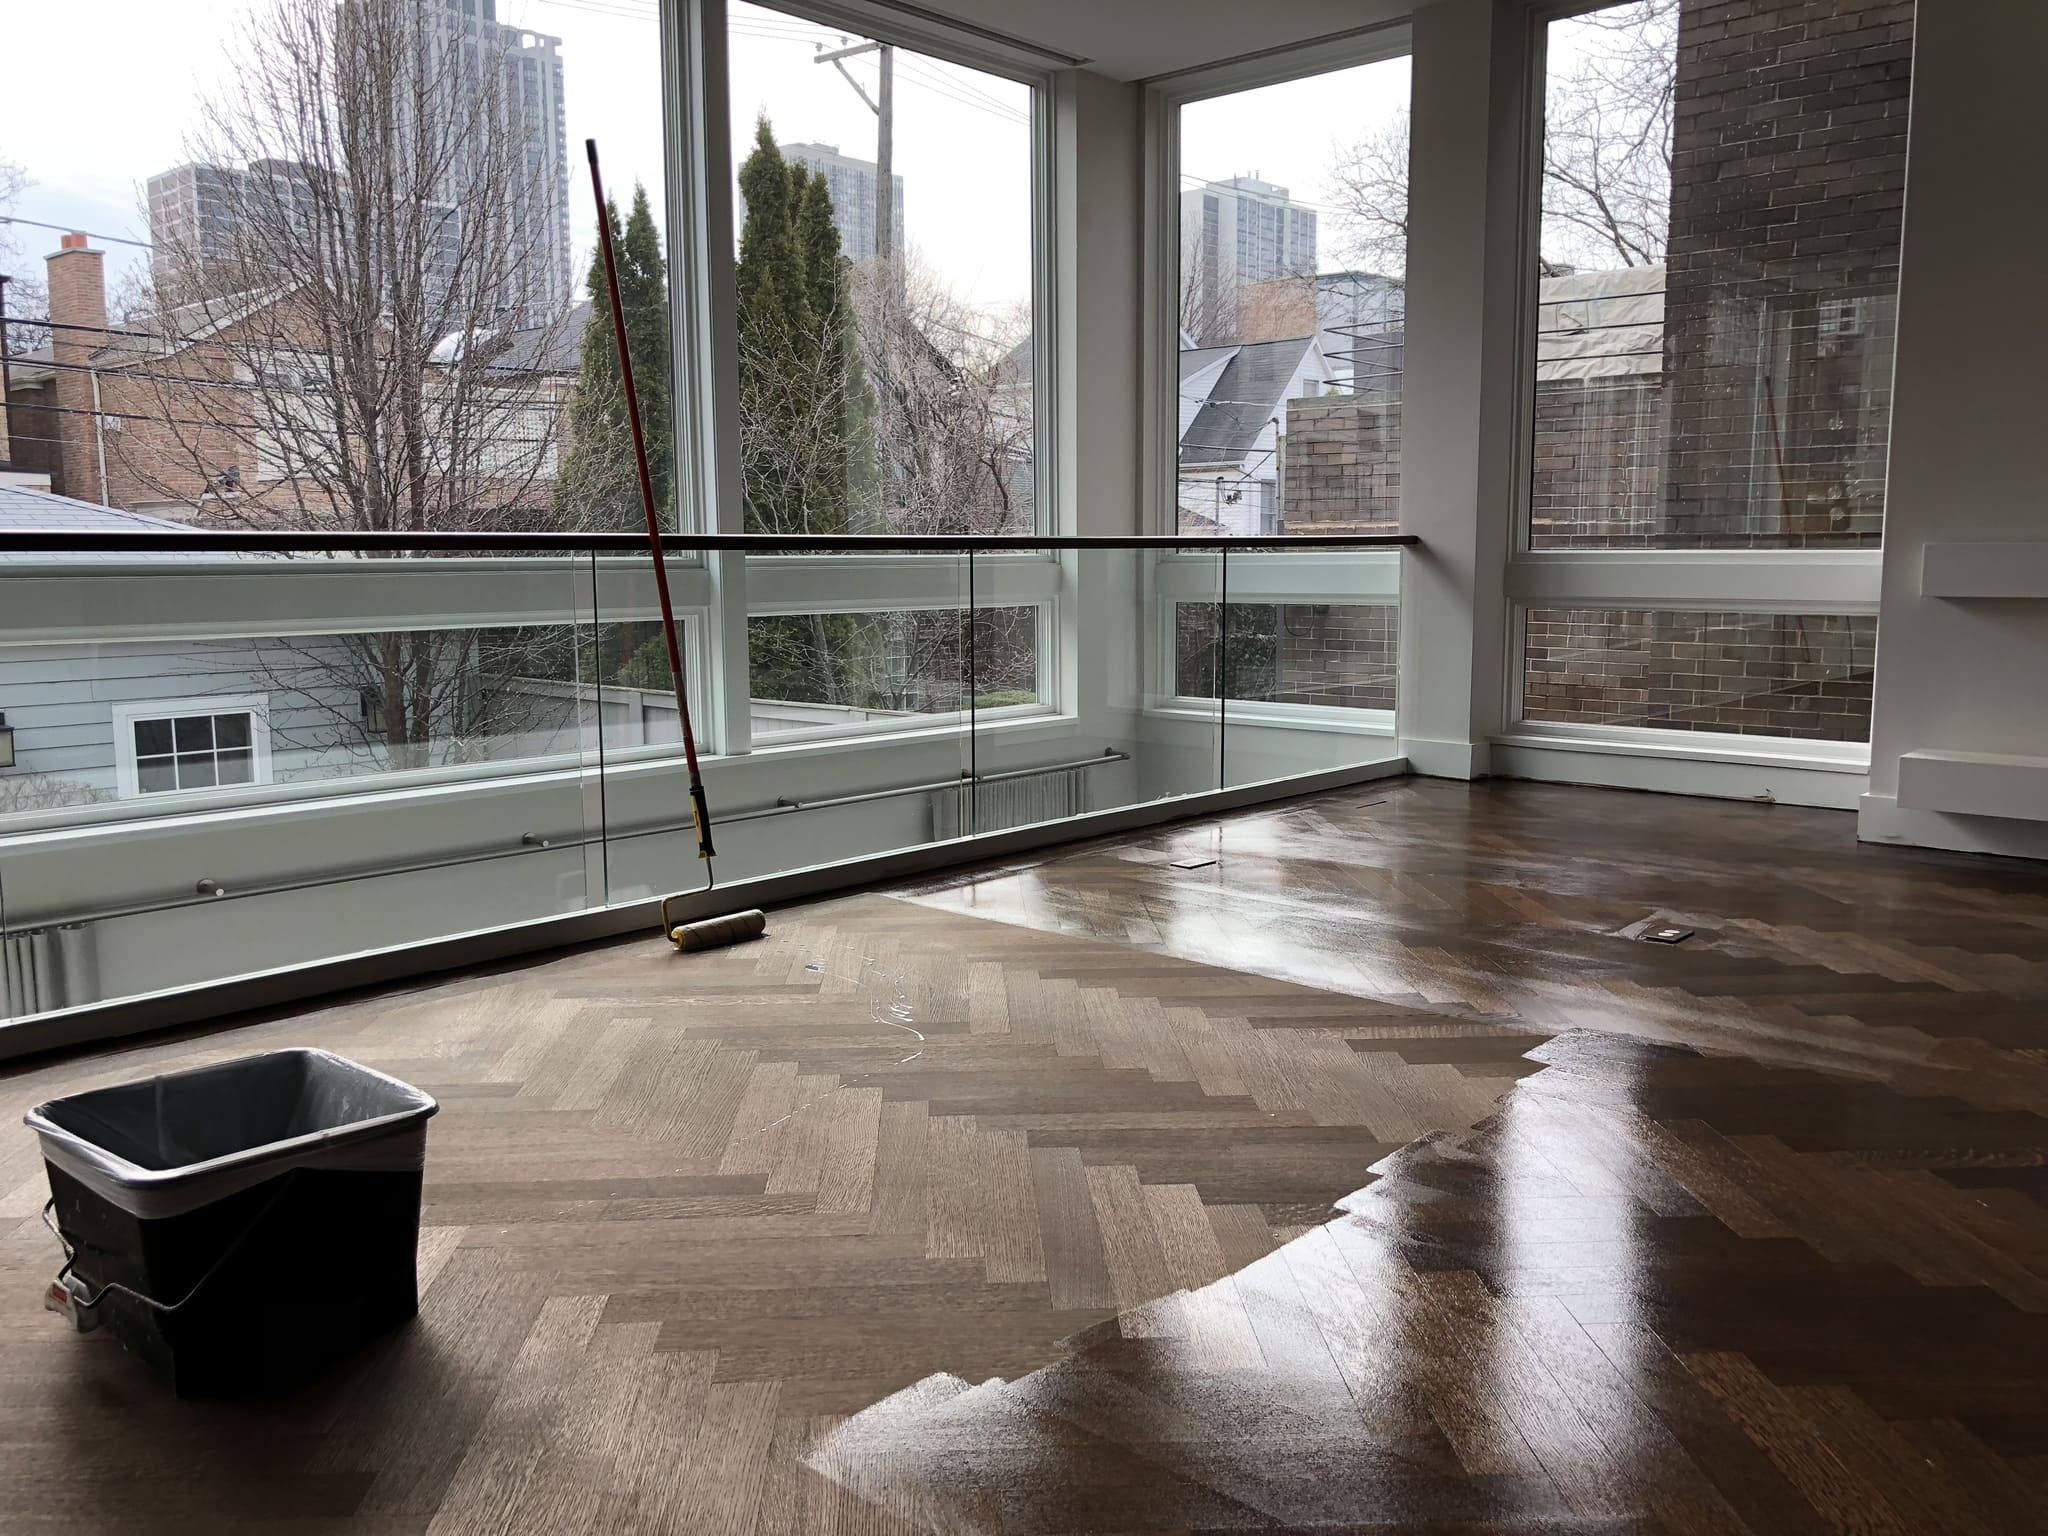
But hey. The messy shit was finally over. The installs were done. It was time to start ripping the runner off of those steps and rubbing sharp rocks against wood. The start of the fun stuff. Cruising that beautiful 30 year old belt sander over some not-super-terribly-old oak. The dust boogers from this one would be something of a marvelous feat. Dust boogers were medals, all well earned in this battlefield of wood floor sanding.
It Was Time To Choose A Color
This was it. This was the day. I have to meet them, the homeowners. Until this point the last time I had seen them was 4 months ago during the initial estimate. They had just closed on the place 3 days before we started, so we let ourselves in through a lockbox when the project began. I haven’t seen them in ages. Should I shave? Should I get a haircut? The flooring celebrity they had hired off of a 7 year old magazine cover was about to show them four colors of oil splotched onto some wood. It was my time to shine.
Walk in, big shot macho man energy, as I always do. Box of half opened and premixed stains in my hands, I’m ready to go.
As I’m walking up, the can in my left hand slips out and falls on my foot, then splashes onto the floor. First color sample done. Three more to go.
I begin tirelessly wiping these damn colors into the wood. As I do so, I think about all of the life choices I’ve made that led me to this point. By now, the fumes from the stain sample I’m making are hitting my head, hard. That beloved Bona brand is about to carry me back up into the sedated heavens with my nose.
As I finally start to come down from the quick high of stain fumes mixed with the constant wood dust floating through the air, I realize I’m done with the flooring samples. Beautiful. I shut my video camera off and wait for the homeowners.
Hardwood Flooring Stain Samples
the homeowners walk in
They’re nice. As I remember them. Very friendly. Followers off of my social media page, and younger folks too. About my age. The sample session flies by. She falls in love with the graphite color, no matter how hard I try to swap her towards the easier option of not doing any stain. Blast, you win this time Mrs. Homeowner.
They walk over to the living room, where I’ve already sanded the floors with the belt sander. Turning around, they also check out the fire place. It was being redone too.
Crazy story? Fireplace guy & I used to street race our cars together when we were teenagers. Yea, the Fast And Furious movies bit me HARD when I was a kid. And here we were years later, remodeling some of the same houses on the streets we used to race through. A bond that can’t be replicated. And a story that can’t be mimicked by ChatGPT.
Anyways, the wife steps to the side and she opens the sliding door to check out the yard. My eyes immediately widen and I begin to panic. This was during the great Chicago Cicada Infestation of 2024. There were so many, that they had been passively falling down through their old fireplace the prior first week while we had been working.
She opens the sliding door. Everything is fine. Quick peak outside with her head, all good. She doesn’t dare take any actual steps outside as the cicadas are buzzing all around. She closes the door back up. They didn’t get her. Thank God.
Relieved, I walk up and show them the back railings. Freshly installed, they look incredible. I start telling them how we’re going to be ready to stain the place in the next couple of days and then I hear it!
The loudest cicada scream you could have ever imagined. Coming directly from her hair.
She starts screaming too. Louder then the cicada. Full pitch. Her husband freaks out and starts grabbing at her hair. Meanwhile, I was standing right in front of her during the scream. I fell over, startled, caught myself on the railing, and nearly broke the new wooden post we had just put in.
He gets it. Grabs it with his full hand, cups it, and like a champion he fucking WWE wrestling slam-throws it down onto the freshly sanded floor.
I take the time to ask him if he wants me to leave the mark from the cicada in the wooden floor, as a sort of trophy. He pleasantly declines and they disappear back into the vast unknown. I wouldn’t see them again until the end of the project. The best type of customers.
After they leave, I promptly begin to continue sanding, and sand off the samples I applied to the floors.

Hardwood Flooring & Staircase Staining Day
It was finally here. The day I dread. The day where I have to get highest out of the entire process of the job. But even the toughest of stains & the largest of square footage projects could never take down Mr. Plus.
The team and I put our disposable gorilla gloves on.
We had our shitty .99 cent chip brushes from Home Depot.
We were ready to turn up the Spanish music and have ourselves a stain infused fiesta.
Let’s get messy boys.


floor finishing day
We made it. Friday, of the following week. Exactly the same day I promised them the project would be finished. Total luck shot on timing? That stays between Mr. Plus and myself.
The staining we had completed the day before turned out incredible. I mean truly, a masterpiece. It’s always good when you don’t have a single spot on the floor to touch up. Unfortunately, on this one, we had about 20. After touch ups were done, we could start vacuuming and applying coats of finish.
We had our tools, we were ready, yet again. Difficulty wise, today was no different than the staining day yesterday. We just had different roles today.
Flooring roller duty seniority is totally a thing in our world of small floor sanding businesses. You can ask any floor sanding companies HR department, it truly is real. Needless to say, I’m the boss man, so I get to cut the line in front of the older guys, obviously.
The feeling of a brand new generic brand paint roller cover while rolling finish. My god, it’s truly indescribable. They just don’t make them like these generic Amazon 6 packs anymore. Covered over a freshly bought Lowe’s Purdy Roller sleeve. If heaven was a paint roller it would be this one. I know these things are plastic, but I tell ya what, they’re putting the same AI technologies into these things that they are into the new golf clubs they make these days. This thing rolls and swings at such a perfectly balanced weight ratio. Most days I feel like I could hit a golf ball better with my paint roller rather than my actual golf clubs.
Finish was pouring on the floor, paint brushes and finish rollers were making their beautiful harmonic symphonies. Things were being finished up. Everything went without a single problem. I’m serious this time too! Pure beauty, pure perfection, and the pure smell of chemicals, all bottled extravagantly into a decently sized suburban home. A lovely scent mix that would ensure the woodworking in this home was renovated properly. One might say this scent is similar to the type of romance you feel with your nose when entering the lumber section of a Home Depot. The same type of aura for sure.

Another battle was conquered, another flooring war has been won. Mr. Plus was able to spend the next 3 days resting easy, while playing video games with his delicate artistic flooring hands resting at the computer. He would sit back, awaiting what future flooring endeavors hit his email inbox next. As soon as they call upon him, he serves.
Finito
Final Project Results Below


Hey, before you go, want to see something super cool? Check this out.
Lol jk. The Amazon affiliate link helps me pay for the massive amount of time it takes to write these stories out and upload so many photos, especially as a full time small business owner. So if you just pressed the link & hit me with some commisshhh, I appreciate it. Also, thank you, Mr Jeff Bezos, please don’t kill me.

Hardwood Flooring Installation & Refinishing Project In Barrington, IL - North Chicago Suburbs
In this blog post, I will discuss and walk you through a large hardwood floor installation & sanding project. This particular project also has a brand new staircase railing installation that we will go over. The project is located in the northern suburbs of Chicagoland. Specifically, in Barrington Illinois.
Well howdy there gang! How is everyone doing?! Patrick here again. I hope you’ve all been well. My last project diary post about our flooring project in Lake Forest did incredibly well. So, I figured, why not share some brand new content with my favorite hardwood floor diary family, since you all seemed to love the last post! This time, I’m back on the scene with the crew in a brand new location, in Barrington, IL. We’ve got not only a brand new flooring install, but also hardwood floor refinishing as well as the installation of a brand new railing system at this Barrington, IL project! We are going to be completely renovating the staircase and restoring it into a brand new modern beauty with brand new Oak railings. We’re going to be adding some brand new Oak floors in some rooms\hallways, and we’re also going to be refinishing all of the pre-existing Oak floors that are everywhere else throughout the home. So strap up, grab some popcorn, and enjoy reading along as I walk you through this massive project! And as always, if you are in the area and interested in having your own flooring project completed by us, feel free to reach out here.
start of the flooring project - initial walkthrough & Demolition
Well, things kicked off on a sunny but cold & windy Monday morning in Barrington when we arrived on the jobsite. The weather was cold, but let me assure you, the coffee was extra hot. The homeowner opened the door extra happy to see the crew and myself ready to tear into their project. The homeowners had made sure to completely clear out the home of all furniture and belongings, as we request with every job, before we arrived and got started.
Tile Removal
After performing a walk through with my excellent team, it was obvious this project was going to be a tough one. There was loads of tile to rip up in the hallway, the front entry foyer, and the entire kitchen. All of the tile was to be demoed, removed, and the plywood was to be cleared of any junk as well as properly resecured in order to prevent any squeaks in the future. But boy oh boy, the whole team knew the kitchen would be a nightmare! Why you ask? Great question. The tile in the kitchen was running underneath ALL of the cabinets. This means there was no great way to bust it up and remove it. In order to prevent any damage to the cabinetry, we would have to cut & chisel every single piece by hand. A true nightmare for any skilled tradesman. Surely, though, we were ready for the task. Our handy dandy grinder made things a little bit easier, but not by much. Here is what all of that tile initially looked like:

Entryway\Foyer completely tiled, starting to remove baseboards before tile removal

Hallway completely tiled. This hallway also led into a tiled bathroom and laundry room that we would be demoing as well

Demolition starting in the completely tiled kitchen (that’s my 70 year old Dad goin’ ham!)
Staircase Demolition
Well guys, now that all of the tile removal was underway, we could also start the next portion of the project. The staircase! It was time to have my phenomenal railing craftsman, Gerardo, come in and start demo on the staircase. And let me tell ya, it was it a lot of work. He started by initially cutting out all of the railings, spindles, and newel posts. Then, he started removing all of the carpet runner from the steps, pulling all of the padding & staples out as well.

Original staircase before the start of demo

Staircase halfway through the demo
As you can see, we were making great progress. Not only on the staircase, but also the flooring as well. The tile was coming up painfully, but at least it was coming up. The second picture of the staircase and the hallway being cleared was after about a week worth of demolition work, and many Redbulls.
Existing Hardwood Floor Refinishing
Yes, I know what you’re thinking, “Patrick, there’s still more to this project?!” That’s right, there is! And that would be the fact that we were also going to be sanding and refinishing all of the pre-existing oak flooring that was already running throughout half of the home as well. Here are a couple of photos of the rooms that had flooring in them already, so you can compare them to what they look like afterwards.

Pre-existing Oak floor in the Living Room

Pre-existing Oak floor in the Dining Room & Front Room
Staircase Refinishing & Starting New Oak Floor Installation
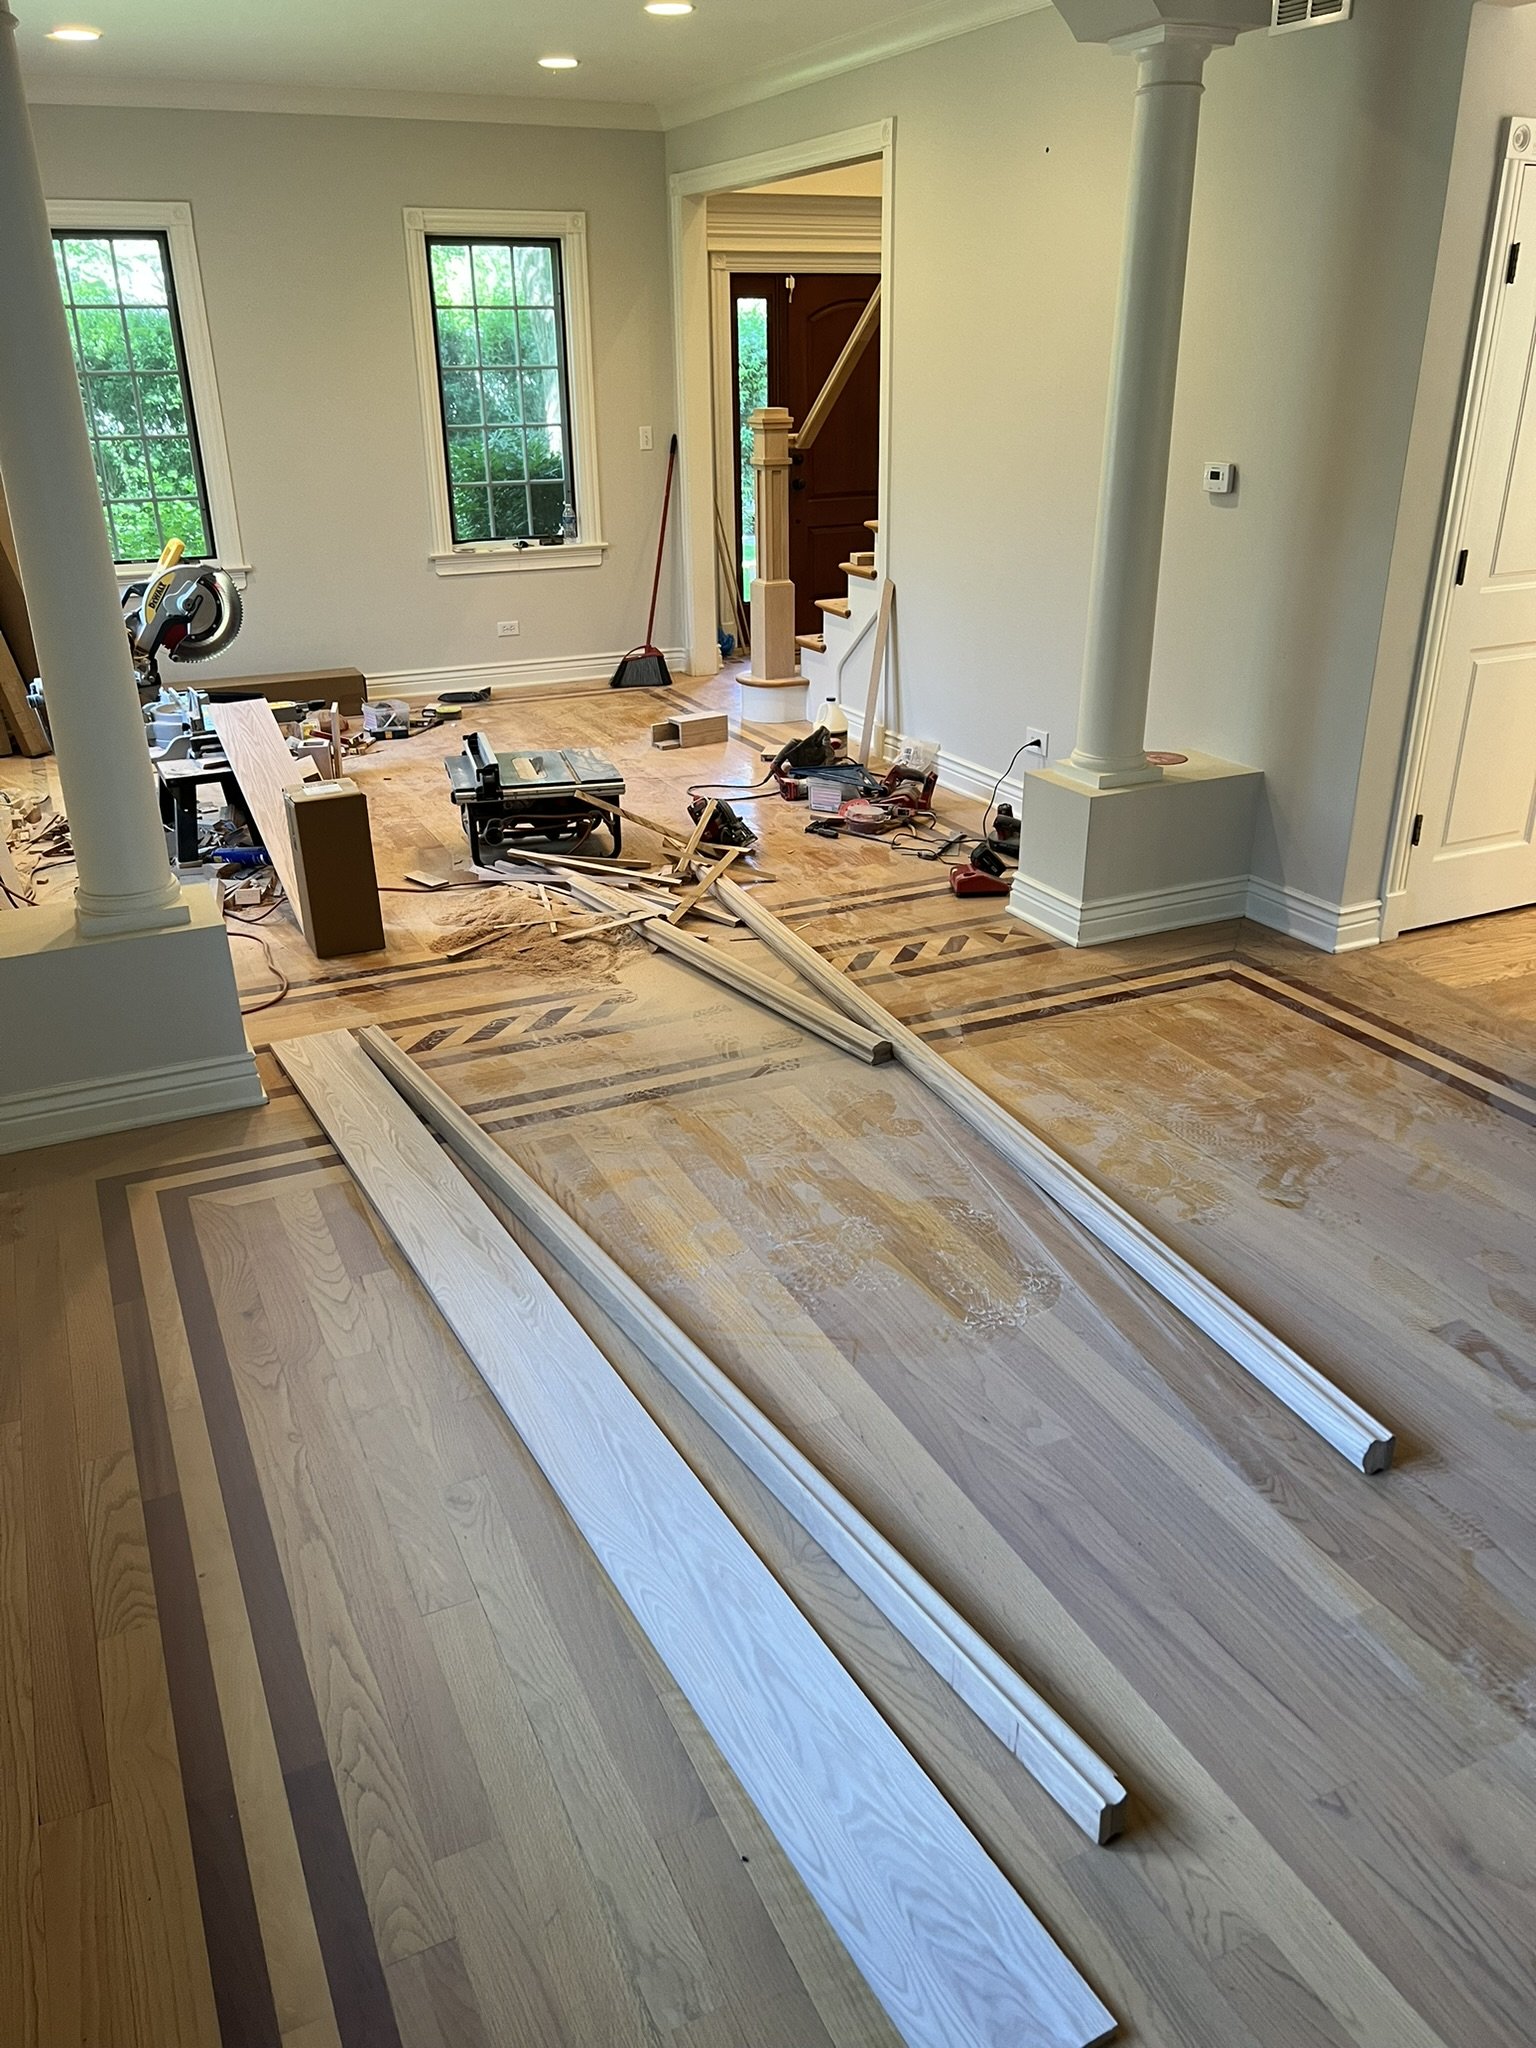
After about a week and a half of grueling demo work and preparing the subfloors to accept their new hardwood flooring, it was finally time to begin installation. Great progress was being made on the staircase too. After Gerardo removed all of the railings, we were able to refinish all of the stair treads perfectly without having any spindles or posts in the way of our sanding machines. The homeowners would be painting all of the risers and spindles white when we concluded our flooring & stairwork. This would help achieve the most modern outcome for the staircase.
Treads of staircase sanded, railing install underway!
First lines of flooring getting nailed in
New Stairs, New Railings, & New Oak Hardwood Floor Installation
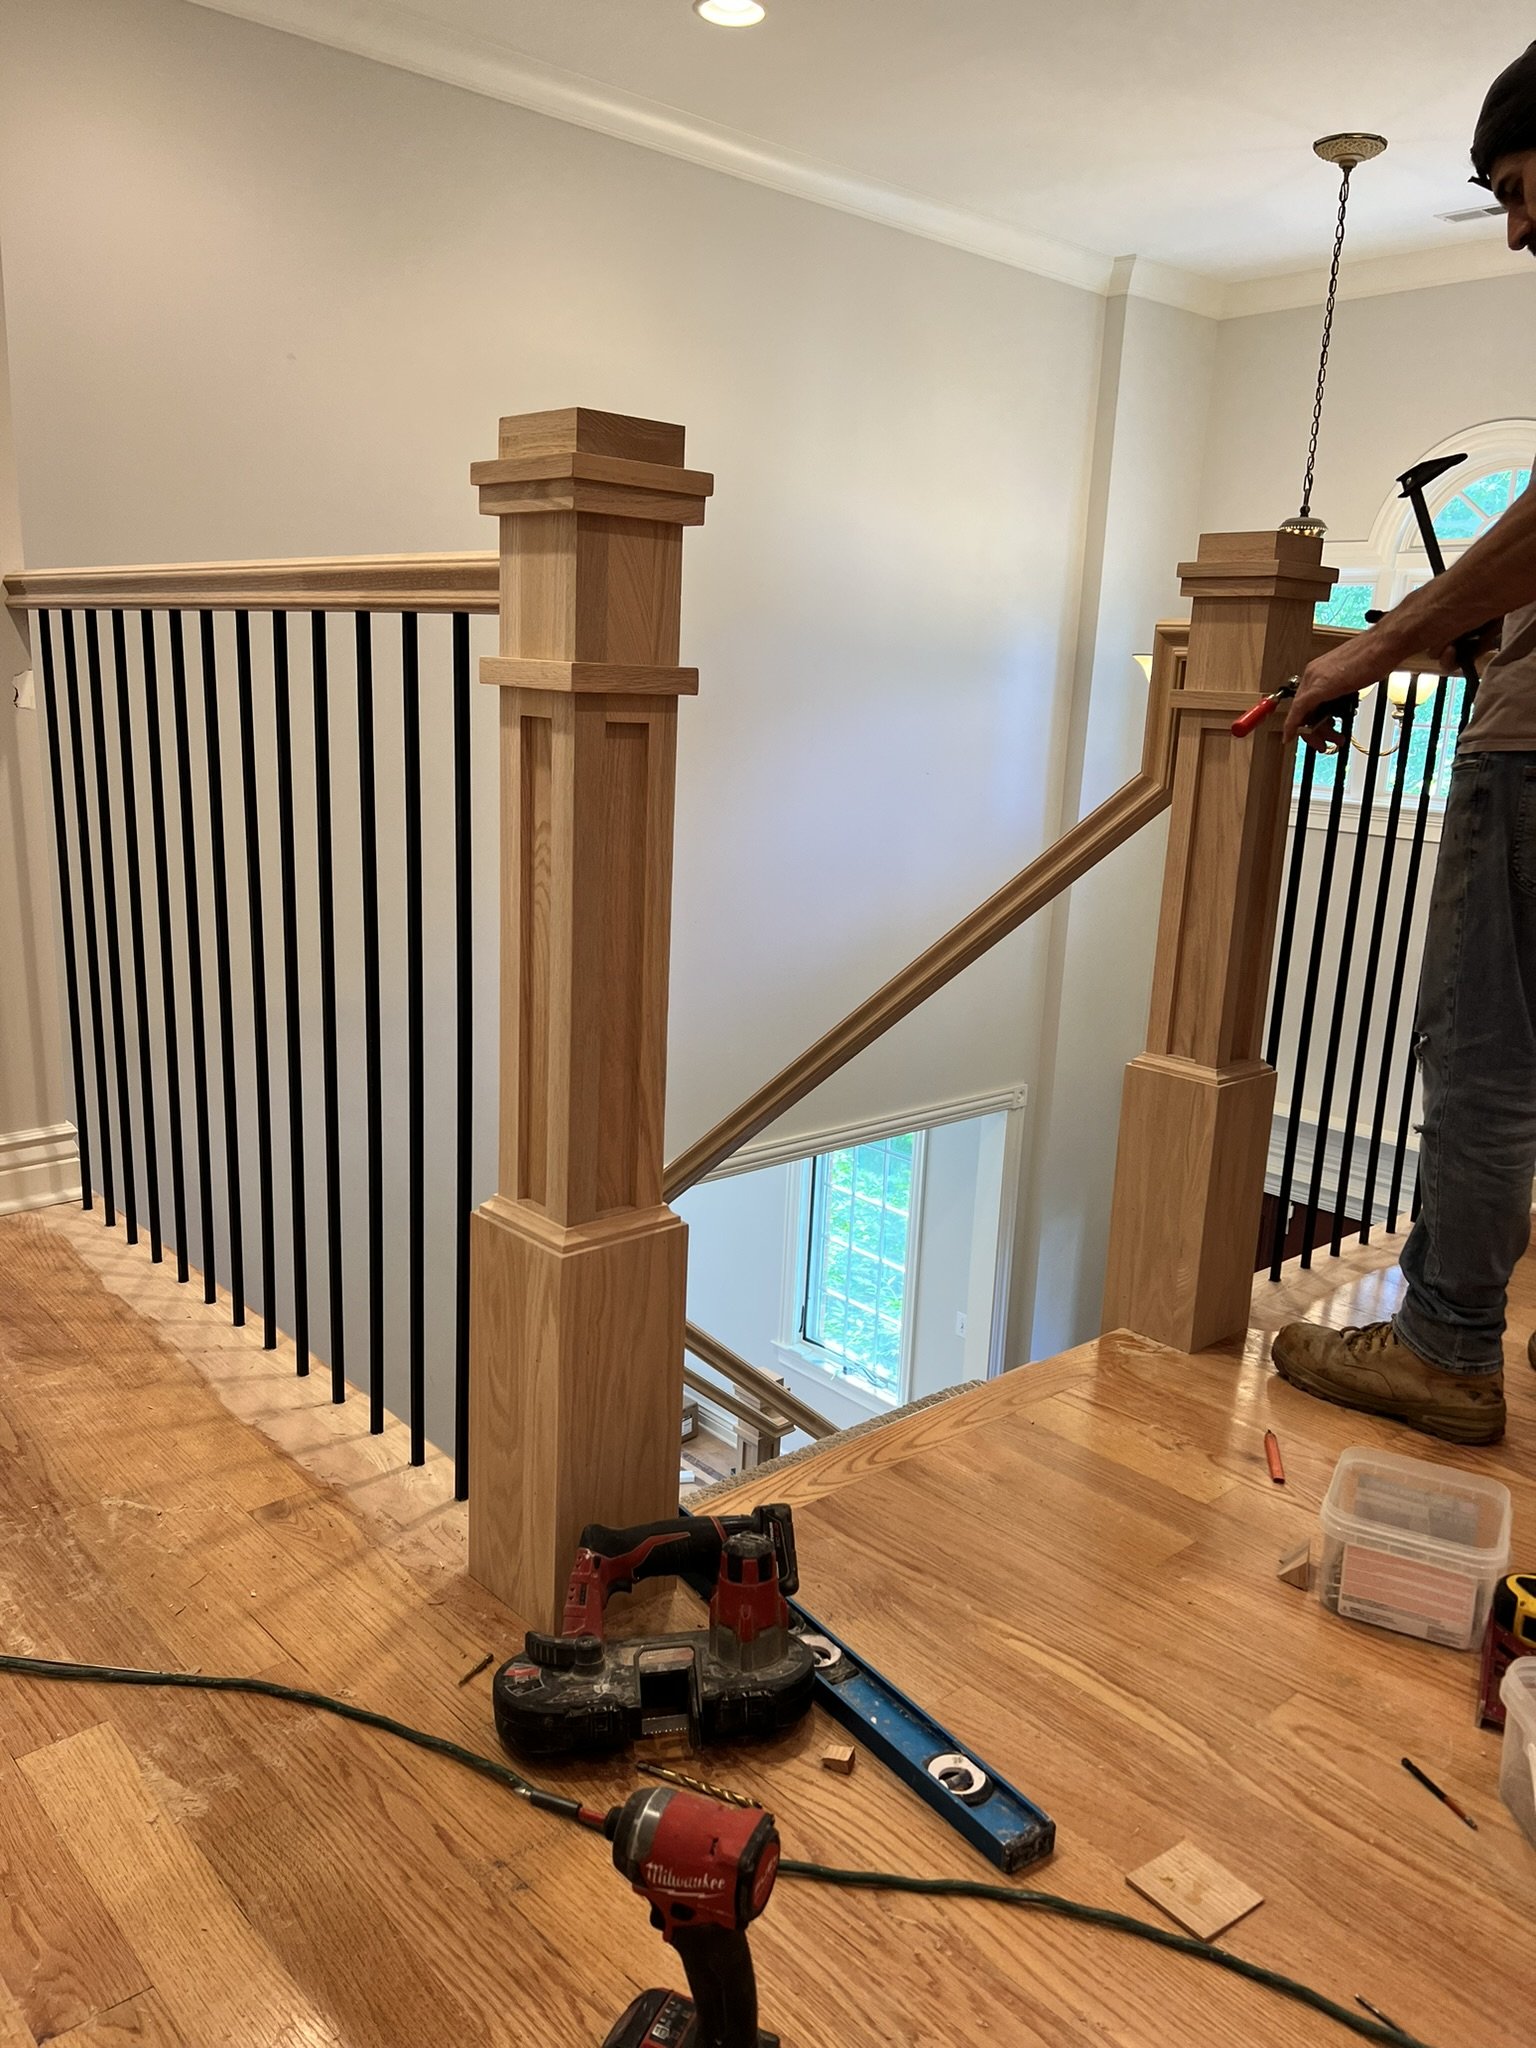
After another couple of days on the project, things were moving along nicely! The plywood was finally all cleaned up, we had all of the areas around the kitchen cabinets cut out & cleaned, and the new floors were starting to install beautifully. Gerardo was making wonderful progress on the railing systems & had most of the posts installed. The customer chose these posts and these spindles.
There was tons of old glue from the tile on the plywood, which the team and I were forced to scrape off by hand. This allowed for a smooth surface for the new floors to be installed over in order for there to not be any weird bumps or un-levelness in the new hardwood floors.
Things kept moving along very well now that all of us were pushing full steam ahead and focused on the installation portion of the project. We were really starting to make some great progress. As you can see, most of the Newel posts of the new railing system were installed, the steps were totally sanded, and the railings were ready to go in! We also decided with the homeowner, that straightening the first stair tread would be a great idea, in order to make the staircase even more modern in appearance. So that is exactly what we did. Gerardo totally rebuilt the first stair tread from scratch, in order to make it straight instead of curved. It came out lovely!

Stairs sanded, Newel posts installed!
Loads of hours later, the railing system was totally installed, the beautiful new iron spindles were in, and the hardwood floor installation was completed! You can see from the photo below, that in the entryway foyer, the homeowner paid an extra fee in order to have us install the new floor board by board into the old floor. In our industry, this can be referred to as a couple of different things, but most commonly, it is called a “tie in” or a “tooth in”. It is an additional upcharge because it goes without saying, that this is a ton of extra work! But the end result is a seamless transition from the old floors to the new ones. Both the homeowner as well as myself decided that this would be the best appearance for the front door entryway right as you walk in. Whereas, in the back of the house, between the kitchen and the living room, we left a turn board in place to make installation easier.

Installation of railings, posts, spindles, and floors finished! Time for floor sanding!
Hardwood Floor refinishing project
Well my friends, the time was finally upon us. After all of the hardwood flooring had been installed, the steps were rough sanded, and all of the railings were installed. It was finally the portion of the project where we get to show off our sanding skills. This, of course, happens to be my favorite part of the entire project! Why? Because this is what sets apart the real craftsmen and artists, from the guys that just do this for a paycheck!
On a hardwood flooring project, sanding is everything. Proper sanding technique is very crucial, and of course, everybody has their own way of doing things no doubt. Sanding wood floors is very tricky, and has to be done in an unbreakable step by step series of grit sequences that can not be done out of order, or you risk a nightmare. Great sanding paper and machines are also the backbone of any proper floor refinishing project. Most companies around our area in the Northern Chicago Suburbs don’t use the high end machines that we do. But what can I say, over here we are wood nerds! So we use the absolute newest and highest end equipment available. Mainly, we use a large German planetary sander called a Lagler Trio. We use this machine to complete all of our medium & fine sanding. Most other companies around this area will simply use a belt sander and a buffer, so the quality doesn’t even come close when you compare it against our floors!

Sanding all of the hardwood flooring in the home
Stain Selection
If memory serves me right, I believe it took us about 3-4 days of full on sanding before we were finally ready for the fun stuff, stain sample selection! The staining day was fast approaching and it was time to lock in a color with the homeowner.
As with all projects, I had the homeowner select their top 3-4 favorite colors from an online brochure. After the rough sanding was completed, I would then apply these stain selections directly to their floors in sample swatches that I would make by hand, in order for them to receive the closest color sample to what they would actually be getting on their own floors. Over the years, I’ve found different floors can take stains and colors differently. So to me, it’s important to show the homeowner these samples during the sanding project, on their actual floors, instead of stand alone samples which can sometimes end up looking a bit different.
The colors that the homeowner chose were: Golden Oak, Special Walnut, Medium Brown, and Gray.
I’ll be honest, I threw the Gray in myself as a wildcard, haha.
From left to right: Golden Oak, Special Walnut, Medium Brown, Gray
Flooring Stain Application
Color selections were in! The homeowner knew exactly the color they had wanted, and if I’m being honest, I think it was a perfect pick. They decided to choose Special Walnut. A color that would be perfectly fitting for the home. It was something that would not only make things a bit more modern, but wouldn’t be too drastic of a change from what they had before. Also, it was a color that we knew would play very nicely with the wooden cabinetry in the entire kitchen. It was time to get messy, it was time to sling some stain!
Floor stain application timelapse in kitchen
Flooring Finish Application
Well folks, my favorite day of the project was finally upon us, the final finishing day! Staining had gone incredibly well the day prior. The stain applied perfectly even, and there weren’t even any spots that needed any touching up. It applied incredibly well over both the old floors as well as the new ones. A difference between old & new was now completely impossible to see.
I personally enjoy applying stain with a buffer using carpet pads. I feel like it goes a bit quicker, and certainly uses way less stain than doing it by hand. But that still doesn’t save you from the edges! All of the edges everywhere still need to be done completely by hand. Buffed on, and buffed off with rags. To minimize mess, we initially cut all of the edges in with a brush. However, when staining a floor, paint touch ups will ALWAYS be necessary. Because of how quickly we have to work applying it in order to avoid lap marks, leaving marks on white base boards is always inevitable.
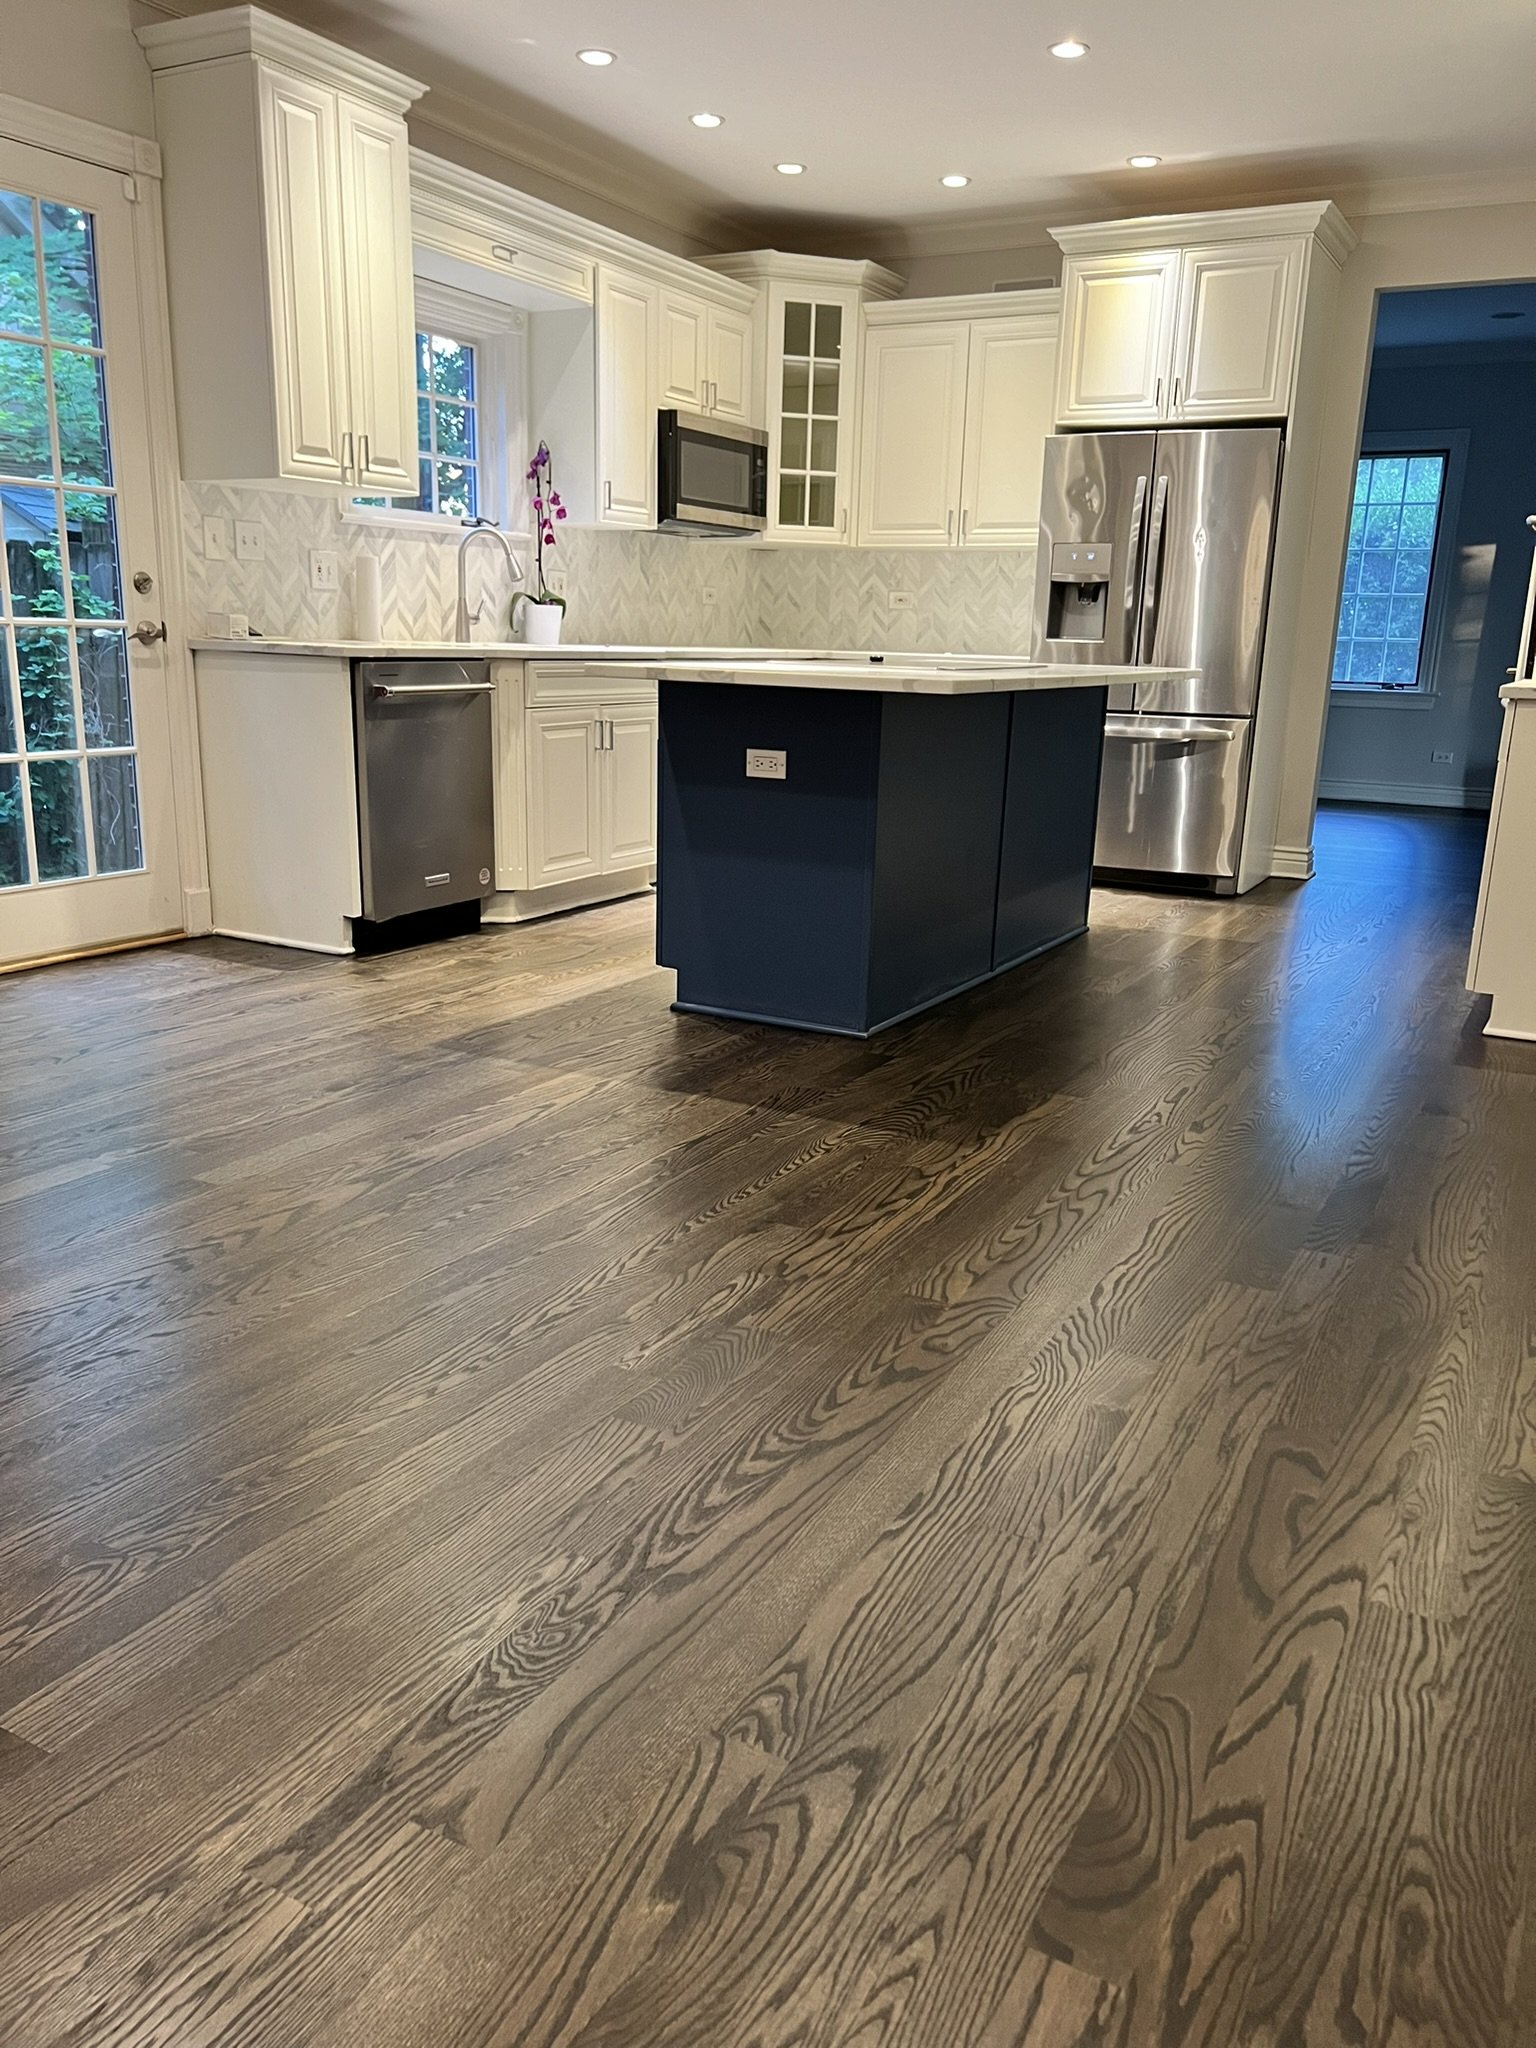
After a full day\night cycle of drying time, the floors were ready for the finish application. On this project, the homeowner opted for our Elite water based finishing package. I always recommend this option as it is incredibly beautiful. And lets be honest, oil based poly is so out dated these days that using it is just more of a hassle than anything else!
Applying water-based hardwood flooring finish
Finished Project!
The time had finally come! All that hard work, all of the blisters, all of the chugged cans of Redbull & Coffee! Was it worth it? I’ll quit blabbering and let you decide for yourselves my wonderful friends…


But Pat…
Whoa, whoa, whoa. Wait just a second. I know what you’re asking yourself, “Pat, did you really leave the staircase like that? It looks terrible! WTF?”
Yes, yes I did. I thought that closing out here at the end, it would be a great opportunity to show people the realistic expectations you must have with a project this large, and how it can sometimes be very difficult to visualize the end result even AFTER our flooring work is completed.
Our work was concluded, but that doesn’t mean that the project was concluded. Remember what I mentioned to you in the beginning of this blog post? Paintwork must ALWAYS come after flooring work. All portions of the staircase that still look ugly, had to get painted! Yes, we could have actually finished those brand new posts with stain to look like the floors, but for more of a modern look, the homeowners opted to paint them white as well. And ya know what? I think it came out looking incredible! So fear not, my fellow bloggers, I’ve saved the best for last. Your final, finished photo, with this incredibly beautiful staircase fully finished and painted.

Fully finished project after staircase paintwork was completed
concluding thoughts
Well hey, if you’re still here and you’ve made it this far, thanks for reading this. I hope you enjoyed our fun Hardwood Flooring project in Barrington Illinois. Hopefully by this point, you’ve happily realized that this post wasn’t written by ChatGPT or some crazy AI. Even though, most days, I worry that AI is taking over the world and we are going to somehow end up in some weird version of either The Matrix or I, Robot. Haha. Guess until that happens, I’ll just keep chugging along and sanding floors.
If you happen to be interested in the flooring services that I offer, and you have a project in the area, don’t be shy. You can always reach out to me here. I offer all types of hardwood flooring services.
Have a good day kitties, I love you all.
-Patrick
Hey before you go, want to see something super cool? Check this out.
Lol jk. The Amazon affiliate link helps me pay for the massive amount of time it takes to write these stories out and upload so many photos, especially as a full time small business owner. So if you just pressed the link & hit me with some commisshhh, I appreciate it. Also, thank you, Mr Jeff Bezos, please don’t kill me.

Hardwood Floor Refinishing Project In Lake Forest, IL
In this blog post, we discuss and walk you through a typical floor sanding project. This particular project has Brazilian Cherry Wood Floors. The project is located in the northern suburbs of Chicagoland. Specifically, in Lake Forest Illinois.
Hey guys, Patrick here! I hope everyone has been doing well and I’m happy to report that I am back with a new blog post! This time, I thought it might be fun to bring you guys along on a cool and unique floor sanding project we recently completed in Lake Forest.
In this blog post, I’ll walk you through what was done and what the process was for this flooring project located in the North Chicagoland suburb of Lake Forest. You’ll also see some of the available color selections for an exotic species of flooring like Brazilian Cherry and the most common looks I tend to recommend with this species of wood.
I’ll offer tips, suggestions, and just general guidance as I walk you through this fun 2,000+ square foot project! If you’d like to learn more about whether or not hardwood flooring might be a good investment for your home, you can read more about it on our other blog post. If perhaps you’ve decided you’d like to add Hardwood Flooring to your home, you can always reach out to us directly here.

Rough Sanding Hardwood Flooring, The First Sanding Pass
Starting the floor sanding project
Well then, let’s jump into it shall we? As with any flooring project, it starts with the rough sanding. For this particular project, the homeowner was pretty unsure of whether they wanted to go with a lighter color or a darker color for their floors.
Realizing & Accepting Color Options
No matter what flooring project I am working on, I always like to clearly explain to the homeowners what their color options are so that they know what to expect. With Brazilian Cherry floors and exotic floors in general, expectations can sometimes be tough. This is because exotic woods like Brazilian Cherry do not take color in the same ways that more common household woods like Oak do.
Types of stains
There are many types of stains in the flooring industry. However, there are 2 brands that simply always beat out the rest. They are quick-drying stain products that are meant specifically for hardwood floor applications. Both of these brands are Duraseal Stain and Bona Stain. Both stains clearly specify that they are quick-drying products. I’d highly suggest staying away from products like Varathane or Minwax, as these can make the color application look uneven and sometimes take days to dry properly.
Stain Colors
Typically, I feel that in most cases when refinishing hardwood floors during the sampling process, many people will apply too many colors. This then only ends up being more confusing to customers. Making it much harder to choose a final stain color. Since we were very limited on what types of colors & stains this wood would take, I decided to present the customer with a small selection of 3-4 color options that I thought would look best in the final outcome. Below are the colors I decided to apply and a description of why I applied them.

Freshly Drying Stain Sample Applied Over Brazilian Cherry Hardwood Floors
Ebony Stain
Applied over Brazlian Cherry Hardwood Floors, this stain was the perfect option for presenting the client with the darkest option available. If they wanted to go super dark and hide as much of the Red color in the wood as possible, this was the choice.
Espresso & Spice Brown Stains
These were both applied right next to each other because they were both very similar. This typically tends to be the problem with Brazilian Cherry in general. A lot of the stains & pigments react identically on the wood. These two colors did present a beautiful variety of grain that still showed through the wood, and overall gave the floors a very rich feel while still highlighting a lot of the unique grain in this wooden floor.
Natural Clear Coating
This option presented the customer with the lightest possibility available. If we wanted the floors to go even lighter, a white tint could have been used over the top which would have mixed into the water-based finish. However, the customer did not want any white, so a natural clear coating without stain was the next best option in order to give them a good color variety to choose from.
Hardwood Stair Sanding Project With a New Spindle Installation
So the colors have been applied, and the floor sanding is underway, what’s next!? Well, I’ll tell ya what’s next, the stair project, haha. After the sanding project started, the client also decided to renew their staircase. This meant that we would be refinishing all of the stair tread tops, and replacing all of the old-style spindles.
Removing Spindles
Since the client had decided on new spindles to make the staircase look a bit more modern, it made sense to cut out and remove the spindles at this time. This is so that the team can sand the entire stair tread with the larger edge sander, therefore minimizing the amount of additional handwork that will be left over to do afterward.

Removing Old Staircase Spindles
staining & Finishing the newly sanded hardwood flooring
After days and days of continuous rough sanding, medium sanding, and fine sanding…it was finally time for the fun stuff, staining, and finishing, the Brazilian Cherry floors!

Rough Sanded Brazilian Cherry Hardwood Floor
The client opted to go with the Spice Brown stain. I agreed that this was a wonderful selection and would really highlight the beauty of this floor while also still darkening it up tastefully.
Preparing Hardwood Floors For Staining
When all sanding was completed, the floors were vacuumed thoroughly and then water was applied to the flooring. This is a technique that I have discussed before, called “water popping”. This essentially opens up the grain of the wood and helps promote a deeper color penetration. On exotic woods like Brazilian Cherry, this is particularly important because it also helps guarantee a more even color application of the stain. I highly recommend applying the water with a backpack pump sprayer. You can find some options here. A sprayer makes it easy to mist the water over the entire floor surface, helping it to dry quicker.
Finishing Hardwood Floors After Staining
After the staining portion of the floors is completed, I highly recommend leaving the flooring project to dry overnight. Sometimes, when using a quick dry stain like Duraseal or Bona, hardwood floors can be coated on the same day. But, when dealing with more than 1,000 square feet, it’s best to play it safe and allow the finish an ample amount of drying time. This will help to avoid issues in the floor finishing process.
Type Of hardwood floor finish to use on Brazilian cherry
For this project, as for many projects, I opted to go with the Loba Invisible finish. I offer this as an additional option on quotes where clients are looking for a tiny bit more durability. This is a water-based finish that has an additional added hardener that gets mixed into every gallon. Loba Invisible is applied in a 2 coat system and dries very quickly.
This finish is a wonderful choice for people that have harder and more durable woods inside of their home, like Brazilian Cherry. But also, it’s great for homes that get more wear & tear from dogs as well as children. Loba Invisible and all 2 component finishes, in general, are highly recommended for commercial spaces like restaurants and museums.
final touches
Well, the finish line is almost here, can you feel it? After the first coat of finish was dried, it was time to reassemble the steps.
Installing New spindles
The new spindles were brought on-site, and installation began. Square, modern, and new spindles were chosen for the staircase this time. I thought the straight lines of the new spindles would greatly modernize the staircase and the overall look of the home. These are the spindles that I purchased for this project.
Final Coat of Floor Finish
Once the steps were completed, the hardwood floors were once again buffed & lightly abraded to smooth away any imperfections from the first coat. With water-based finishes, the grain often raises quite heavily after the first coat of floor finish application. For this reason, it is always recommended to lightly buff the floors before the final coat of finish is applied.
After the floors were buffed, they were also vacuumed. The entire home was then cleaned and prepared for the application of the last finish coat. Below are some of the final pictures after the floor finish dried. I threw in a couple of before pictures into the mix as well.

Finished Hardwood Staircase With New Spindles Installed

Newly Refinished Hardwood Floor

Freshly Refinished Brazilian Cherry Hardwood Floor
Thanks for Reading!
If you’ve made it this far, thanks for taking the time to read this. This blog has grown quite tremendously over the years, so I’ve decided to really try providing more content regularly. If you enjoy these project walk-throughs, please like the page and let me know if you want to see\read more about our Hardwood Floor Sanding & Refinishing projects around the Chicagoland area. If these posts gain enough popularity with our blogging audience, I’ll make them a regular thing. As always, thank you for being here, and if you ever have any flooring questions or if you’d like to book a floor installation & sanding project you can call us or fill out our contact submission form.